Corruption in database is a common problem. Nothing is worse than losing your important date due to corruption. So if you too are facing corruption in your SQL database then I can imagine what you are going through. Well Microsoft has provided some useful commands to fix the corruption issue. Let’s discuss them.
DBCC CHECKDB Command: This command is used to check the database corruption or in other words it checks the physical and logical database integrity. If DBCC CHECKDB command finds corruption in the database then REPAIR_FAST, REPAIR_REBUILD or REPAIR_ALLOW_DATA_LOSS can be used to fix the corruption.
What if DBCC CHECKDB Command fails?
Sometime DBCC CHECKDB command (repair_rebuild or repair_allow_data_loss) also fails to fix corruption. In this situation the best option is to try a good third party SQL repair tool. These SQL repair tools can repair corrupt mdf & ndf file effectively and the most recommended SQL repair tool by the expert database administrators is Stellar Phoenix SQL recovery.
Stellar Phoenix SQL Recovery fix corrupt mdf & ndf files even when DBCC CHKDB fails: This powerful tool repairs corrupt mdf & ndf files efficiently. It repairs corrupt SQL database even when DBCC command get failed. Some of its key features are:
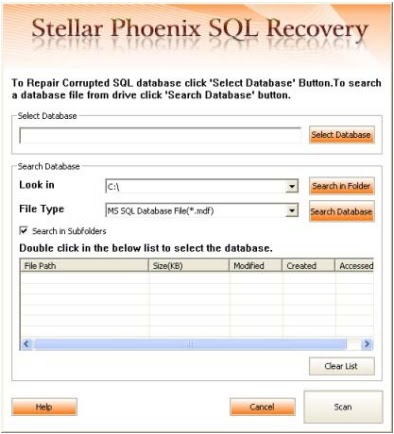
3. Click 'Select Database' button to select the corrupt mdf file.


7. Now click 'Start Repair' button to repair your corrupt file.
8. You can save your repaired file at default or new location.

DBCC CHECKDB Command: This command is used to check the database corruption or in other words it checks the physical and logical database integrity. If DBCC CHECKDB command finds corruption in the database then REPAIR_FAST, REPAIR_REBUILD or REPAIR_ALLOW_DATA_LOSS can be used to fix the corruption.
What if DBCC CHECKDB Command fails?
Sometime DBCC CHECKDB command (repair_rebuild or repair_allow_data_loss) also fails to fix corruption. In this situation the best option is to try a good third party SQL repair tool. These SQL repair tools can repair corrupt mdf & ndf file effectively and the most recommended SQL repair tool by the expert database administrators is Stellar Phoenix SQL recovery.
Stellar Phoenix SQL Recovery fix corrupt mdf & ndf files even when DBCC CHKDB fails: This powerful tool repairs corrupt mdf & ndf files efficiently. It repairs corrupt SQL database even when DBCC command get failed. Some of its key features are:
- Repairs corrupt tables, views, triggers, stored procedures, queries, functions etc.
- Recovers database from suspect mode.
- Allows you to save the non-recovered views, queries etc in a text file.
- Shows preview of recoverable objects before actual recovery.
- Supports xml data types and indexes.
- Supports SQL Server 2012, 2008 R2, 2008, 7.0, 2005 and 2000.
Steps to repair corrupt mdf & ndf files:
1. First download and install the software from Stellar official website.
2. Go to File-> Open MS SQL File.
1. First download and install the software from Stellar official website.
2. Go to File-> Open MS SQL File.
3. Click 'Select Database' button to select the corrupt mdf file.
4. If you don’t know the location of your corrupt file then click on 'Search Database' button.
5. After search is complete, select your corrupt file and click on 'Scan' button.
6. You can also see the preview of items after scanning.
6. You can also see the preview of items after scanning.
7. Now click 'Start Repair' button to repair your corrupt file.
8. You can save your repaired file at default or new location.


No comments:
Post a Comment